Showing posts with label mint. Show all posts

Friday, June 17, 2016

Wraps of linden leaves stuffed with elderflower-rice


Linden (or lime) trees are known for their medicinal properties and aromatic blossoms. Their leaves are versatile greens that add a special touch to various culinary creations. My favourite way to use them is in wraps, in much the same way as vine leaves are used in dolmades. Ideally you pick them up in early spring when the leaves are young and tender. I like to get a bunch of them and prepare them in brine for later use during the rest of spring and summer. 


If you are late for the early harvest and only find older leaves, you will notice that they get a bit more fiberish. Still it is possible to cook them in salty water (for 10 minutes or less, depending how hard the leaves are). Add them to a sterilised glass jar, add a brine made from water, sea salt and apple cider vinegar - like with vine leaves - and close it with the lid. Leave them in the brine for at least a week in the fridge before using them. I like to add much less salt and vinegar as the usual amounts we find in commercial vine leaves. If you don’t want to use a jar, you can also freeze the boiled leaves.


You can wrap basically any grain dish with linden leaves, as they have a neutral flavour. My favourites grains for that are rice and quinoa (Check my next blog post for another idea of a quinoa recipe to be used with linden leaves). Add your favourite spices, fresh herbs and vegs to them and they are good to go. 


Here is an idea of rice scented with elder blossoms.

Ingredients  

2 cups rice (preferably sushi rice or arborio)
2 1/2 cups water
1/2 cup elderflower blossoms (without the stems)
Zest of one (organic) lemon, finely grated
1/4 teaspoon allspice
1/2 teaspoon ground cardamom

1/2 cup elderflower cordial
1/4 cup apple vinegar
1 teaspoon sea salt


Method

Bring the rice with the water, elderflower blossoms, allspice, cardamom and the lemon zest to a boil. 

Reduce heat to medium and cook it until the water totally evaporates. Add the rest of the ingredients, cover with a lid and leave it in low fire for 3 more minutes. 

Remove from fire keep it covered until it almost cools down completely. 

Add a little portion of the rice to the center of a linden leaf and wrap it as you would with vine leaves. If it is not season of linden, you can use this recipe also wrapped in wine leaves. You can also use it in nori sheets, as sushis. Add raw or steamed vegetables of your choice. 
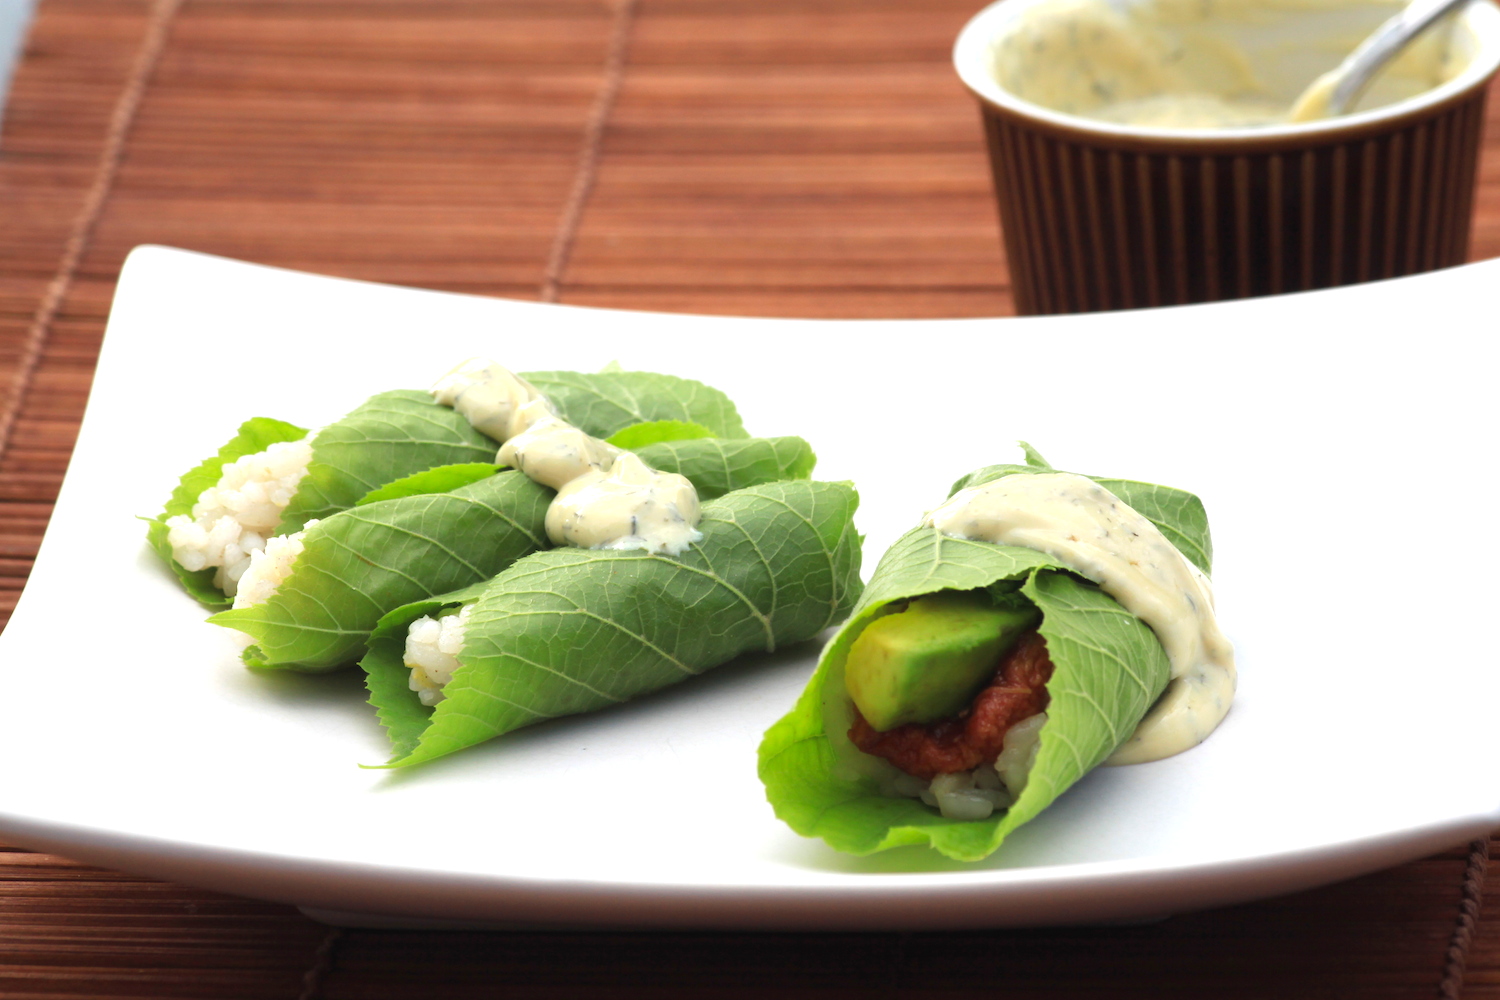


Serve with mustard-dill sauce or mint-yoghurt sauce. 

Mustard-dill sauce: 

1/2 cup Go-On Alpro soy
2 tsp dijon mustard
1 - 2 tbsp coconut sugar of sucanat
1 tbsp dried dill

Add all ingredients to a little sauce bowl and whisk it until everything is well blended. It keeps well in the fridge for at least 3 days, in a air tight container or jar.


Mint-yoghurt sauce:

1 cup soy yoghurt
2 tbsp coconut milk
1/2 tbsp sea salt (or to taste)
1/3 cup finely chopped fresh mint leaves
1/3 tsp lime zest

Bring all ingredients together in a sauce bowl. Stir it well enough until it becomes a smooth cream.   


Tuesday, May 31, 2016

Kibbeh


I love Lebanese food. This is one of my favourite versions of a vegan kibbeh. A similar snack is made in various Middle Eastern countries, with varying names to it. 


Ingredients:

2 cups bulgur (preferably a Turkish type they call “koftelik”, meaning that it is suitable for koftas) 
2 cups boiling water
2 tbsp lemon juice
zest of one lemon
1/2 ts allspice
1/3 ts ground cinnamon
1/2 ts sambal (or chilli paste) or more if you wish
1 ts dried mint
1/2 ts dried marjoram 
1 ts sweet paprika powder
1/3 cup tomato paste (concentrated) - or rosehips compote if you wish 
1 full cup of fresh mint, thinly chopped
salt to taste (as reference, I used 1 1/4 tbsp sea salt  - use much less if using table salt)
3 tbsp olive oil (a good quality olive oil makes takes this recipe to another level of yumminess, but I choose not to use any oil to avoid extra calories and it is still very delicious)  


Method:

Add the bulgur to a large bowl, add the boiling water and allow it to swell (it should take about 5 to 8 minutes). The bulgur should be soft enough. 

Add all the other ingredients and knead the dough with your hands until all the spices have are well spread and the consistency is sticky.

Shape the little kibbehs with your hands. 


I love eating them just like that, with salad. 

You can also fry them or spread the dough on a greased baking tray and bake it for 20 minutes in 190°C. If I make the oven version of a kibbeh, I like to add 1/3 of the volume in cooked and mashed potatoes and adjust the seasonings accordingly. The potatoes help it to be moist and it adds a better texture to the baked version. If you make it in the oven, try adding tomato slices on the top - or cashew cheese. Or both. 


Tuesday, April 12, 2016

Endive mango salad with pecans and fresh mint

Endives are one of the easiest salad ingredients to use in recipes. Their bitter taste is perfectly balanced by the sweetness of a ripe mango in this salad.


Ingredients:

4 medium sized endives, chopped
1 very ripe mango, in cubes
1 tablespoon sesame oil
1 1/2 cups of fresh mint, roughly chopped
1/2 cup pecans, crushed
sea salt to taste (optional)

Add all the ingredients to a salad bowl. Stir it all gently. Add the salt immediately before serving it, to avoid water formation.

Enjoy it!


Wednesday, March 2, 2016

Falafel with Black Eyed Peas


The idea of making crunchy fried balls or croquettes using beans is centuries old. You can find classic recipes of "beans balls" in various Middle Eastern countries, but also in in India, Africa and South America. I called this recipe "falafel" only because that is probably the most famous word to describe "beans balls". In Brazil one would call that "acarajé", or "bolinho de feijão", meaning beans croquettes. It does not matter what you call it, you can use basically any type of beans to create your own nutritious and delicious crunchy thingies. Simply soak the beans for at least 12 hours, grind them in a food processor, add spices of your choice and fry them in hot oil. You can shape them as balls, as snacks,  burgers, or - if you are the creative type - any other shape you want. Just make sure they are not too huge so that the inside gets well cooked (you don't want to eat raw beans).  ;-)

In this recipe I used black eyed peas, as they are some of my favorite beans. They offer a very nutty flavour and take the spices in a very nice way. They also do not get as dry as the regular chickpeas falafels.  

Ingredients

500g dried black eyed peas (or other beans of your preference)
2 tbsp white tahini (should be fresh, not the bitter type)
1/2 tsp ground cumin
1 tsp ground coriander
½ tsp of ground allspice
1 tbsp sea salt
1 tsp dried mint
½ tsp ground cardamom
½ tsp chilli pepper 
½ tsp grated nutmeg
1 tsp sumac (optional)
½ tsp baking powder (optional)
1 ½ cup of fresh coriander/cilantro, roughly chopped (or mint, or basil if you are not a coriander fan)
½ cup flat-leaf parsley, long stems removed, roughly chopped
Sunflower or other vegetable oil, to fry


Soak the beans in plenty of cold water overnight. I left them for 14 hours, but if your beans are older, you might want to leave them soaking longer. In that case, refresh the water after 12 hours and leave them for another 8 or 10 hours. 

Drain and blend them with all the spices, salt and fresh herbs in a food processor. Add the tahini while the processor is still running, until all ingredients are well combined. I like the mixture not entirely pureed, but finely ground. 

Heat more or less 3,5 cm deep oil in a small pan over a moderately high heat (180C/350F) and fry a teaspoon of the mixture to check the seasoning. Adjust salt and spices if necessary. Chill the mixture for at least 20 minutes. Just before frying the falafels, add 1/2 tsp baking powder if you want (it’s optional). Use two spoons to shape the falafels, making sure the spoons used to shape the falafels do not touch the hot oil and go back into the mixture (that could change the texture of the dough and it might not work anymore). Turn the balls as soon as they get dark brown on one side, let them get brownish on the other side and when ready, take them immediately out of the pan and drain on kitchen paper. Serve with tahini sauce, and a seasonal salad.


It can be frozen for later use.

*Note that the amount of spices and salt mentioned here are only a “guideline”. It always depends on personal preferences as well as on which brands and types you use. Sometimes I need to use half the amount of salt if I work with regular table salt (when not cooking at home for instance). Also the spices, if using freshly ground coriander, I might need less than if using a type that has been ground for several months (like when we buy it ground in the shops). 

**For the fresh herbs, there are plenty of herbs that could work in here, so even if you are not crazy about coriander/cilantro you can perfectly replace it by other garden herbs to your liking.  

*** Feel free to use other wild greens, such as nettles or dandelions to enrich this recipe. In winter time I like adding some nettle seeds to it, as it is incredibly rich in minerals. 

**** If you prefer a low fat version, you can also bake these in the oven. It is easier if you make the dough a little bit more liquid. Add a few tablespoons of flour (rice, chickpea, buckwheat...) or tapioca starch, add 1 tsp baking powder and bake them on a greased oven dish at 190°C for 15-20 minutes, depending on how large they are and how efficient your oven works.


Friday, March 20, 2015

Crunchy & healthy snacks with wild leaves


Here is a very easy and delicious recipe that will convince everyone - even the kids! - to eat more wild greens. It is also a great way to shift to healthier snacks and it might help curb other undesirable food cravings - usually for junk.

You might need a food dehydrator for this recipe. It can be an electrical one or a solar one. There are many tutorials and videos on youtube on how to build a solar dehydrator using recycled materials. Some of those ideas work even in places where there is often not enough sun to get things dry, such as where I live. Some regular ovens can work on low temperatures, so if you have one of those that might also work out. 

What you need for this recipe:

Wild leafy greens; freshly picked: dandelion, ground ivy, valerian, mint, etc.


Coating:

Tahine (sesame paste)
Sea salt
Coconut aminos, miso or tamari (all optional)
Water (or apple juice if you want to give it a sweet contrast) 
Herbs of your choice. I use rosemary, oregano, savory, thyme or other available aromatics
A pinch of chili
Lime zest + lime juice (optional but it gives a great taste contrast with the tahine and other herbs)

Rinse the wild greens and dry them in a salad spinner. Mix the ingredients for the coating well until smooth. Dip each leaf in the liquid, making sure they are entirely covered with a thin layer of it and place them in the dehydrator trays. You may also work with teflex baking sheets over the trays, to protect the trays from getting too messy. Do not place leaves over one another. 

Dehydrate under 40°C to 45°C until crunchy (it may take from 2 to 5 hours, depending on how thick the coating is and how moist the air is outside. If you want an extra crunchy layer you can make sure the dip coating is thicker - but that will take much longer to get it dry. A thin layer will be also crunchy, but very fragile. 

When ready, take them out of the trays immediately and store them in a very good air tight container until the moment to be served. Sometimes after a few minutes after they are out of the dehydrator they start getting soft again. If they get soft again because you did not take them out of the dehydrator quick enough, just run the dehydrator half and hour extra and they will get back their crunchiness. 


Instead of tahine you can also use other nut or seed pastes (cashew, almonds, hazelnuts...). I sometimes add some hemp seeds to the coating dip, without mixing it. That gives a very nice texture to the snacks. 


Chocolate mousse with chia seeds


Why not combine the pleasures of high quality Belgian chocolate with this superfood known as chia seeds? Pretty easy to make and it keeps well for longer than a week in the fridge. That is if you don’t eat the entire batch in the first day. 


Ingredients

2 tbsp chia seeds, soaked in a full glass of water (240ml)
200g dark chocolate - organic & fair trade
250 ml almond milk / oat milk or coconut milk
2 tbsp mascobado sugar / sucanat / stevia or any other sweetener of your choice (optional)

Additional ingredients that could bring this recipe to an entirely new level (add one or more of these if you want to play with your taste buds):

2 tbsp orange compote or
1 ts orange zest, finely grated with a microplane
1/2  ts cardamom powder + 1 ts cinnamon powder or
1/2 ts mace powder
4 drops mint essential oil
3 tbsp coarsely chopped (roasted) hazelnuts

Let the chia at least 2 hours soak in the water. During the first 3 minutes stir them occasionally to avoid any lumps. It will end up as a thick gel.


Melt the chocolate in bain-marie and add the milk of your preference with the mascobado sugar / sucanat (if desired). If you decide to add other special flavours such as cardamon, mace or orange compote this is the right moment to add them.


Now add the chia gel to the chocolate and mix well with an immersion hand blender. Pour it into glasses or dessert bowls and refrigerate at least 4 hours before serving. Sometimes it may be faster to reach the right texture. The next day this dessert is at its best.


You might feel the need to adjust the ratio chocolate / milk / chia seeds depending on the type of chocolate or depending on the type of milk you use, or the desired texture. The more liquid additives, the creamier it gets, but less stable too.